Monday, 16 August 2021

Thinking about teaching reading - online discussion

 We had a great online meet today with other secondary teachers in Manaiakalani with a focus on reading. I made a record of the discussion questions and my responses. In some cases, I have changed my thinking as I reflected on the discussion.

  • Describe what was happening for the group of learners you selected, their strengths and needs. Discuss evidence you have e.g. anecdotal observation, learners’ blogs, data, student voice, conversations with whānau and previous teachers

My group of learners is the Y10 Literacy target group - students reading or writing below curriculum level 5. These are divided into A group (those curriculum level 3 or below) and B group (those at CL4). About one-third of my Y10 class is in at least one of these groups. One obstacle is that most of the students have low confidence in their ability and are so used to 'failure' that they are very risk-averse.

  • Summarise the student learning challenge you planned to focus on in 2021. Talk about why this is important for your school/kura i.e. what difference will this make for your learners/school?

The challenge is to accelerate the progress of these learners. The underlying challenge is to engage the students and get them motivated and hopefully actually enjoying reading and writing.

  • Your hunch - describe what you can change or do differently in order to improve learning experiences and outcomes for students. The simplest way is to say -  if…..    then…..

e.g. “If I encourage my students to write for real reasons, then they will be motivated to write.”

If I can enable these student to experience success in reading/writing, then they are likely be more motivated to learn and try their best.

  • Learning - Describe how you have acquired new knowledge and skills to make changes in your practice e.g. PLD, readings/research, ideas from your colleagues

I completed the DFI course last term. Also, I engage in ongoing PD via school, twitter and Manaiakalani. I also want to look into the Manaiakalani research in more depth.

  • Taking action - describe what you are planning to do (or have done) differently. 

Have you planned to regularly monitor the impact of what you are doing differently? e.g. surveying learners/whānau, Smiley Face Chart  from e-asTTle, something you are already using to assess e.g. Running Record, doesn’t have to be quantitative.

Is there a take out from this session that could work for you?

With the next unit I teach with my year 10s (film study) I want to build in some reading activities with a range of related texts, looking at some of the issues raised in the film such as virtual reality, gaming addiction, escapism online v real life, etc. In terms of monitoring the impact, the reality is that it will be mostly formative feedback and observation, until we do our end of year Asttle and PAT tests.

Thursday, 1 July 2021

DFI9 - Manaiakalani - Digital Fluency Intensive Course - Week 9: External Recognition & Looking Forward

This was the final week of the DFI and the big thing on our minds was the Google Certified Education Level 1 exam!


Learn

Reflecting on what I have learned this term over the time of the course, the most important learning has been finding out about the Manaiakalani kaupapa and pedagogy. 

I was pretty tech-savvy already, having been an early adopter of a lot of the tools and technology available and attending various GAFE and ULearn conferences over the years. When our college joined Manaiakalani I was happy about the digital tools and learning to use new ones, but to be honest, I was a bit lukewarm about Learn-Create-Share and how relevant it was to me as a senior high school teacher.

It has been reassuring and really helpful to find out more about the history of how the pedagogy was developed and the strong research base for it. It is also great to see the synergies between Learn-Create-Share and the NZ Curriculum.

Now, as a curriculum leader, I want to ensure that Learn-Create-Share is fully integrated into my curriculum planning. I want everyone in my department to have the opportunity to complete the DFI so that when we begin planning our new courses and units for the revised NCEA Achievement Standards, we can incorporate the Manaiakalani kaupapa fully into the planning from the outset.

I wish I had done this course years ago - it has really changed my attitude to the whole relevance of Manaiakalani to my teaching and learning programme.


Create

Today's CREATE focus was the exam, in which we had to apply some of the skills we have learned to creating and manipulating various files and using the different Google tools. I can't tell you WHAT though, because... duh... it's an exam!


Google Exam - Success!


Share


Editing Images in Slides

I just have to tell you about something I learned last night when preparing for the exam. Did you know that you can edit images actually IN Google Slides? I did NOT! I was like: it doesn't fit, it's the wrong shape - download it, open in Preview, crop it, change it up and then upload it again. But there is an easier way!

In your Slide presentation, you can right-click on an image, and you get a handy little editing menu pop up, which enables you to do all the standard things like crop, rotate the object, adjust colours etc. And if by accident you mess it up, there is even the option to Reset Image back to the original!


Te Reo Māori Keyboard on Your Smartphone

Years ago when I set up my keyboards on my iPhone, I couldn't find one for te reo Māori. I'm not sure if it just didn't exist then or I couldn't find it, but it is now available. I often use Italian or French when chatting online with friends so it was great to have those keyboards, but I became really tired of having autocorrect try to change my Māori kupu into English. If you have this problem you can find the instructions here for adding the Māori keyboard to your iPhone or Android phone or tablet.


Looking Forward

Now that I have completed the DFI, I think one big challenge for me, moving forward, will be to continue to make time on a regular basis for exploring new online tools and learning new skills. My first goal is to pass the Google Certified Educator Level 2 exam.

In terms of my curriculum leadership role, I want to delve even further into the Manaiakalani research base and ensure that the kaupapa and pedagogy are embedded in our revised programmes and units as the NCEA changes roll out.


Thursday, 24 June 2021

DFI8 - Manaiakalani - Digital Fluency Intensive Course - Week 8: Computational Thinking

It's the second to last week of the DFI and the pressure is hotting up! I am trying to stay calm about sitting the Google Certified Educator Level 1 Exam next week, but with planning, marking and reports to do as well, it is hard not to stress!


Learn


The 'New' Digital Technologies Curriculum

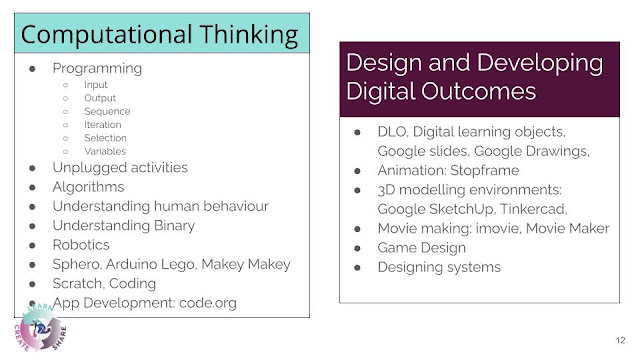
Kerry reminded us that the 'new' (or perhaps more accurately 'revised') Digital Technologies Curriculum has been mandatory for Years 1-10 since 2020, though its final launch was somewhat overshadowed by Covid-19. There are two new learning progress outcomes:

- Computational Thinking for Digital Technologies
- Designing and Developing Digital Outcomes


The main change is for students to be using the technology to create digital content rather than just being consumers of it. As teachers, we need to be making sure that what we are doing in the digital environment is helping students achieve their educational outcomes. For me, as an English teacher, the digital outcomes side is easier to relate to: movie-making is part of the English curriculum (creating visual text) and slides and drawings are part of what we do as well. It is harder to stretch my mind around some of the other tools, digital learning objects and computational thinking, but a colleague in my bubble did give the example of a class using Tinkercad to construct a model of an historical pā site. I can see how you could potentially apply this to students exploring, for example, settings in a novel.


Empowered

Today's Manaiakalani kaupapa from Dorothy Burt was EMPOWERED. In the original Manaiakalani cluster in Tamaki, the average adult income is NZ $19,000 p.a. Low income like this limits choices that families can make: choices about housing and health among other factors. New entrants arriving at these schools are behind both academically and in their health and physical development. So empowerment for these communities is a huge kaupapa. 

“The Manaiakalani kaupapa of empowerment is about the advancing of 

Rangatiratanga;  taking back control of their own lives.” - Pat Snedden, Chair, MET.


Manaiakalani does make a difference for these students and their whanau. Research has shown, for example, that the vocabulary and language skills deficit can be overcome by teaching conversational patterns (using the 5+ a day and ping pong conversation idea). Through families purchasing the students' devices for a minimal payment ($4 a week or similar) they find that after a year, the family now has a credit rating for the first time and is able to access hire purchase arrangements which were previously closed to them. Students are also able to help whanau use the technology to make and access medical appointments online. Having their children's learning connected, ubiquitous and visible is empowering, not only to the students themselves, but to their families as well.

Dorothy also recommended we check out the following TVNZ show from Nigel Latta where he explored what it feels like to be a person who does not feel empowered in many areas of life.


Skill Learning:

Our skill learning for today was all about computational thinking. The last times I had anything to do with coding it was all about writing programmes to pull information out of a database or to model expenditure and interest rates etc. At that time I was working as a policy analyst and other people were writing the programmes - I was coming up with the modelling parameters for them to work with when writing the code. Today we were given a variety of different learner programming tools to choose from, some of which are created for very young learners.


Create


Minecraft Voyage Aquatic

During the Explore time before lunch I had a play with Minecraft, using simple block coding. I completed the first tutorial/adventure.


You can check out my awesome block coding skills here at this link.

I also got a certificate for completing my Hour of Coding:


Minecraft Hero's Journey

I enjoyed the exploration time on Minecraft in the morning, so during our Create time in the afternoon I joined the Minecraft group to learn some more coding. It was lots of fun. I found the hardest thing was understanding what the instructions were asking me to do. Actually doing the coding was easy once I had worked out where I was supposed to be sending my agent!

The only thing I have yet to figure out was how it remotely relates to teaching senior English, but I am sure I will think of something eventually... suggestions welcome!


Share


The Future of Technology

Vicki Archer gave us a look at some different cutting edge technologies that are impacting our lives. Probably the big one was messenger RNA vaccines which, as we all know, are hopefully providing a rapid solution to the current pandemic. Another interesting, but to me slightly ominous one, was GPT-3, which is all about machines learning to write. (Shades of Orwell's 1984 novel-writing machines.) 

Aside from advances in robotics (Hanson Robotics' Sophia, who walks and talks and all that), there was a handy app (sadly not free) called SkinVision which scans your mole and compares it to 3.4 million images, then tells you if you need to get it checked out by a real doctor. For us, with the high levels of skin cancer in NZ, this is probably a good one to know about.

A good site to explore with students to look at the ethical issues behind how machines are programmed to make decisions is Moral Machine, where you can see scenarios that a self-drive car, for example, might encounter. Whose life is valued more: the homeless person's or the car passenger? The male pedestrian or the female one? Scary stuff...


Minecraft Coding

If you are reading this blog and think you could never learn to code, go to this link and have a little play, it is fun!


Bye for now, I'm off to play with Minecraft prepare for my Google Certification Exam!


Friday, 18 June 2021

DFI7 - Manaiakalani - Digital Fluency Intensive Course - Week 7: Devices

 I really enjoyed focussing on my class sites last week so I arrived at this week's DFI with a sense of accomplishment. Folks in my digital bubble were very complimentary about what I had done on my Year 13 Literary Criticism web page, so that made me feel GOOD!

Learn


Today's Manaiakalani kaupapa is UBIQUITOUS: that our learning is anytime, anywhere, anyone, at any pace. It's about removing barriers and making sure that our young people have the opportunity to expand their horizons.

Our rangatahi can take part in the activities they want to, which enrich them, but still have access to the learning from school and be able to review it at a time which works for them.

By the time they start school, students in lower socio-economic areas, regardless of language spoken in the family, have heard 30 million fewer words than students from wealthier socio-economic backgrounds.

The Manaiakalani research has shown that the 'summer slide' effect on learning outcomes is significant, so they instituted a Summer Learning Journey. The students who participated showed it is possible to arrest the summer slide: their writing results accelerated over the summer holidays and they also made some progress in reading. This is with just THREE experiences they choose to participate in over the summer.

Making learning REWINDABLE makes it accessible to more learners.


If it's worth LEARNING,
it's worth capturing.

Note: Rewindable does NOT mean staring at a video of the teacher's talking head for an hour...


Cybersmart Curriculum

From the start of Manaiakalani, there has been an emphasis on digital citizenship and empowering our young people to make smart decisions about their digital footprints online. In the Manaiakalani model, - Being Cybersmart/Tū Atamai i te Ipurangi - is the roof over our whare.

The idea is that you would take the resources from the Cybersmart site and personalise them for your school and class. Cybersmart is a whole school focus right from new entrants so that young people are making good decisions from the start - through planned and deliberate teaching of digital citizenship.

The idea is that you would take the resources from the Cybersmart site and personalise them for your school and class. Cybersmart is a whole school focus right from new entrants so that young people are making good decisions from the start - through planned and deliberate teaching of digital citizenship.

  • Term 1 - Smart Learners (LEARN)
  • Term 2 - Smart Footprint (CREATE)
  • Term 3 - Smart Relationships (SHARE)
  • Term 4 - a combination of cybersmart issues.

So... hopefully, by the time students in our cluster arrive at senior secondary school, their cybersmart knowledge is consolidated and inbuilt. Well, that's the theory!


"Whenever and wherever we share online... it's personal!"


Skill Learning

Our skill learning for the day was experiencing the student learning interface. For Years 1-3 in Manaiakalani, this is on iPads, using an app called Explain Everything. While this is not applicable to me as a high school teacher, it was interesting to see what the learners coming through our cluster from Year 1 will have experienced. I have to say that I found the iPad experience extremely challenging and our bubble coach definitely needed to 'Explain Everything' to me! We also used Chromebooks - the devices my students use every day - to complete a number of tasks. I found this much easier as I had at least used the devices and taught some of the skills before.


Create


Using Explain Everything on the iPad

This is a thing which five-year-olds can do really easily, but which I found very difficult! I had to add an app to my iPad mini and learn how to make a project and record my voice. I exported my project as a video and tried to embed it here on my blog, but something went horribly wrong... causing my entire blog to go haywire when I published it and for me to have to completely redo my blogpost... so instead, here is a photo of what I created! 


I also completed a teacher-created writing project in the app. My iPad is too old to work with a stylus so I was writing with my finger, which didn't help! I did not succeed in saving the reading project in a format which would work here on my blog, so you will have to take my word for it that it was not very flash!


Creating screen recordings using Screencastify

This was our main creative task for the day which, for me, was a lot less challenging than completing a five-year-olds reading task! Admittedly, this was mainly because I have used Screencastify before, including with a green screen, so it was more familiar territory. 

For the content of our videos we were asked to engage with some of the resources and learning materials provided by Manaiakalani for teaching our students to be CyberSmart. I created this video which could be used to introduce students to the Creative Commons licences and show them how to search for resources by the licence:


This video could probably be used as it is now on my class sites. However, it is a bit long, the section on the slide show goes on too long and I could have focussed more on the summary slide. I don't think it is terribly classy or engaging! It does the job though, and it would be rewindable learning. It achieves the learning aim of explaining what Creative Commons licences are and how to find and use that information. But I can see why being a TV presenter is an actual... THING. It doesn't just 'come naturally', even to those of us who spend all day presenting to students in a classroom!


Share


Hapara Workspace

Did you know you can search for Hapara Workspaces by 'NZ Curriculum'? I did not. On the menu bar in Workspaces Home, click Discover (to the right of My Workspaces). Then select NZ Curriculum and search by keyword. 


Screencastify Tips

The latest version of Screencastify has a little sidebar which makes it easier to pause and resume recording and stop recording:


I also discovered from experimenting today that it is easiest to record video related to separate tabs as separate recordings. You then open the first Screencastify recording in the Editor, and add the other recordings to it. 

If you want to trim the beginning or end of one of the separate videos, you need to do that BEFORE you add it to the combined recording (as I discovered by doing it the wrong way the first time). The final video I made, as posted above in the 'Create' section, was actually five different Screencastify videos all joined together after trimming where needed. You export the final version and... voila!


Blogger sidebar

Makaore showed us today how to add in a list of blogs as a gadget on your blogger sidebar. I am thinking about whether I would do that on this blog or not. One advantage of having a class blog list on the sidebar is that it sorts by who has most recently posted, so it is easy to see who in the class has completed their posts and who has not. But I have four classes, not all of which blog. I have the blogs for my Year 10 class linked on the class website and that is probably more useful for now. I can see that for a primary class it would be great to have that gadget on the sidebar of a class blog. Now to decide whether I need/want a class blog for my Year 10 class... watch this space!


Wednesday, 16 June 2021

DFI6 - Manaiakalani - Digital Fluency Intensive Course - Week 6: Sites - Enabling Access

Learn

Day 6 of the DFI focussed on the kaupapa of CONNECTED.  Dorothy emphasised the power of connection with our fellow human beings. She talked about the history of the original Manaiakalani schools - 13 schools all within walking distance of each other, but they only came together to compete. The digital connectivity and collaboration completely changed all that. She acknowledged that the face to face is important - an ideal - but the ability to connect digitally enables us to stay in touch with colleagues and fosters our wellbeing. Today, there are 100 schools in the Manaiakalani network, connected by a visible and shared language of kaupapa and pedagogy. The Manaiakalani pedagogy programme design focusses on Learn in Term 1, Create in Term 2, Share in Term 3, and  Term 4 bringing the three together to support innovation and acceleration. The professional development offered includes:

  • Principals' PLG
  • School leaders' PLG
  • The Digital Learning Intensive
  • Toolkits
  • Admin staff PLG
Learning is shared and visible using Twitter and RSS feeds to connect to Professional Learning Networks (PLNs). 380,000 tweets later... You can follow the Manaiakalani cluster on twitter @clusternz

There is also Tuhi Mai, Tuhi Atu which is similar to Quadblogging but with a Manaiakalani pedagogy focus, using class blogging platforms to connect schools across the clusters.

Te mea nui rawa ia ko te noho tahi, 

ko te whakawhanaunga, ko te whakawhitiwhiti whakaaro


...the important thing is living together, making friends and exchanging ideas


Leading Learning using Google Sites - Makaore Wilson

The purpose of a learning site should be as a one-stop hub for learning. It should be accessible from anywhere, any time, at any pace. Learning should ideally be rewindable and students should be able to access it multiple times if they wish. Planning and teaching are visible, with weekly overviews and timetables etc.

Navigation should be straightforward with as few clicks as possible to get where you are going - no more than three clicks, preferably.

Skill Learning

The skill-learning today was all about Google Sites, with a few Blogger and Hapara Dashboard tips thrown in for variety. 


Create


Google Sites

Today's 'Create' time was spent working on our class websites. I chose to focus on the Literary Criticism web page on the site for my Level 3 English class. The aim was to make it more multi-modal (as per last week's learning focus). 

We looked at a variety of websites from different schools across the Manaiakalani clusters. Then, in our breakout bubbles, we looked at each other's webpages, rating and commenting on them, with suggestions for improvement. 

BEFORE

Here's what my Literary Criticism webpage looked like at the start of the day:


My site was very wordy, with a lot of text, not a lot of images, and lots of text with links. You also had to do a lot of scrolling down to see everything.

The feedback I received from my group included the following:


I set myself the following goals:

1. Create a slideshow for each topic and link the resources from that.

2. Embed more of the resources rather than text with links.

3. Include video of me presenting each slideshow - do at least one today.

4. Make the task completion tracker student-driven.

I achieved part of goals 1, 2 and 3 on the day. For goal 3, I did make one screencastify video on the day but when I was speaking to the slideshow I made it full screen so the video window of me disappeared - I decided it wasn't really usable and I would have to re-record it, so that is on my 'To Do' list now to complete. I also followed the feedback suggestion of creating a subpage so that there wasn't so much scrolling down.


AFTER

Here is what the top part of my site looked like at the end of the day, with the Hapara Workspace embedded and the Introduction to Criticism material replaced by a slideshow:


Below this there was no change so I haven't bothered taking screenshots.


LONG AFTER

And here's what the same material looked like after I had been playing with it for a week, created a subpage, and added some student work which had happened in the meantime:


If you would like to check out the real thing, you will find the web page here.

The next thing I want to do is make videos of the introduction to each section so that the teaching (=chalk and talk) part of the lessons is rewindable. 


Share


Google Site Tips

I think my key learning from the day came from exploring websites from other schools and seeing at first hand how the visual component of the website is actually very important, even to a 'word nerd' like me. It made me realise that I have to make my sites more VISUAL. So here are my key takeaways to share:

  • Use images, GIFs and video
  • Embed objects (slides, docs, etc) rather than just having text with links
  • Consolidate information using Google Slides and embed these so that material takes up less space and looks more inviting
  • Minimal clicks to get to things
  • Use subpages for extended information rather than going on adding material down the page that the learner has to scroll to find
  • Make tools to track learner progress open to the students to update so that they take more responsibility for managing their learning


Thursday, 3 June 2021

DFI5 - Manaiakalani - Digital Fluency Intensive Course - Week 5:

Since last week's DFI, I have become more familiar with using Toby to organise my tab collections. I have also had a bit of a play with Google Forms and Sheets. I am afraid I still find writing nested formulae in Sheets 'does my head in' - especially since clicking on a cell to add its coordinates into a formula now seems to delete the entire equation, grrr. I was reduced to deciding if I had time to go and write my formula in Excel and then copy it... 

On the plus side, I finally seem to be getting over the sinus infection that has been plaguing me for the last couple of months. Having just a little bit more energy has been great and I am rapidly catching up with the marking backlog caused by the fact that for most of this term I have been falling asleep in the evenings and not getting any marking done most nights.


Learn

Today's Manaiakalani kaupapa and pedagogy focus from Dorothy Burt was all about Visible Learning. According to Dorothy, there is no academic paper to tell us the 'definition' - it is either visible or it's not. To whom is it visible? 

        • The learner - who is always at the centre;
        • The whanau - visibility to whanau is critical to living te Tiriti o Waitangi;
        • The wider community.

In critiquing our own online teaching and learning practice we need to ask whether we are really unpacking the learning journey and making it completely visible to students and whanau.


Hapara Dashboard makes the students' learning visible to the teacher, but the blog makes the young people's learning visible to whanau and the wider community.

Conversely, the internet can sometimes also be responsible for introducing barriers to visibility: by introducing layers of security and passwords which have the power to lock whanau out of the learning journey; and design for the teaching space that has far too many clicks to find the learning material.

Creating Multi-Modal Sites - Kerry Boyde-Preece

  • Engaging (the Hook) - we want students to be excited about coming to the site.

  • Empowering - we want teachers to be empowered to create interesting sites.

  • Learning - in our site design we need to cater to different learning styles and modes.

  • Multi-modal - is really about different forms of communication.

Essentially, we are talking about students having lots of different ways to access learning on our sites, catering for different reading levels, accommodating different learning styles, and making it accessible at different times (rewindable learning). 

Our class website is like a shop window: we have to make it interesting, we are selling our subject or topic, and we want to draw students, whanau, colleagues and community in and engage them.

"...Trying to represent that inner window so that when someone is walking past they go, 'Oh wow, I really want to go into that store..."

We need to make choices about the technology so that the novelty won't wear off. Students need to be able to navigate the site and be empowered to manage their own learning. 

In looking at personalised learning, Kerry referred to the work of Chrissie Butler, looking at Universal Design for Learning (UDL).

We need multimodal design for personalised learning:

  • Engagement

  • Accessibility

  • Empowerment & agency (making choices)

  • Cognitive complexity to improve understanding and outcomes (multimodal texts)

  • Differentiation for personalisation

  • Universal Design for Learning (UDL)


Skill Learning:

Our main skill learning today was around creating and editing Google Sites. I was already reasonably confident with this but today I learned what some of the menu options were that I had not explored and it was positively enlightening - I discovered some much quicker ways to do things than I what I have figured out for myself previously by trial and error. Some other skill learning included Hapara Sharing, Using Labels in Blogger, Google Jamboard, the Multi-Text Database and T-Shaped Literacy Skills.


Create


Collaborative Planning

We worked in small groups to plan collaboratively for creating a multimodal site. This was based on the T-Shaped Literacy Skills concept of exposing students to multiple authentic texts. In our planning, we used the Multi-Text Database, a teacher-created, dynamic resource. My group was looking at Artificial Intelligence and the primary text we looked at was a curriculum level 4 article called Emotional Robots

We did our shared planning on a Google Jamboard, a tool I had not used before, which is similar to Padlet. I then did some individual planning on another Jamboard slide for my own site:


Creating a Multimodal Site

In the afternoon, we moved on to the main creative task of the day: creating our own website based on the collaborative planning. At this point, I subverted mine from a science to a literature theme on Artificial Intelligence, using the slideshow article as a Scaffolding Text and switching the Primary Text to Phillip K Dick's novel Do Androids Dream of Electric Sheep? I included some short stories, a feature film, several articles and opinion pieces and a number of videos. I don't actually have a set of these novels and am not likely to be teaching such a unit in the near future, but it was fun to plan anyway. This is the website I created (click on the image to go to the site):


For this to be a more effective multi-modal site I would need to include student creative activities - at the moment it just has a lot of resources for students to view and read. I would include a link to the film and the novel cover image would go to a sub-page with novel study material and activities. This could be the basis of a Year 12 or 13 theme study for connections.


Share


Examples of some multi-modal sites

During our 'explore' time we had the opportunity to check out some multi-modal sites created by other teachers. I had a look at these ones:


     Y7/8 Science Fiction                   Y9 Romeo and Juliet                Y11 Creative Writing


Judging by what hooked me in, I need more videos, graphic texts (comics/graphic novel) and creative tasks on my sites! Of the three sites I looked at, the most amazing was the Romeo and Juliet site and I highly recommend that you go and have a look. According to Maria, this site was a collaborative one created by the Tamaki College English Department. Kudos to them, it is fabulous!


Hapara Sharing

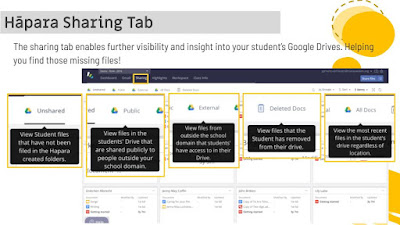
Things I didn't know about Hapara Sharing which could make my life and your life easier: for a start, that you can see which files in a student's drive are of external origin (from outside the school domain) and which of their files have been shared. Even more helpful, you can see files the student has created and not filed in their Hapara folder. But wait, there's more: you can see files the student has deleted! Hopefully, this will prevent some of those "I don't know what happened to my assessment, Miss, it disappeared" moments.


Google Sites

The first totally tiny but hugely mind-blowing thing I learned about Google Sites today was how to change the background colour of the webpage and web objects. I know. I should have known you could do this. But no. All my websites have a plain white background - boring, boring, boring - because I didn't know any better.

You know how the banner across the top of a new Site page is narrow and your image never fits? Well, no more downloading it to crop it in Preview, as the new 'Anchor' feature (next to the little icon for adjusting for readability) allows you to shift around on the image and then anchor it in that position. Hooray!

Inserting material from Drive on your site is made easier when you use the right-hand insert menu. It shows the Drive path right there in the bar on the webpage. You do not need to have the Drive folder open in another tab. I knew that. Not.

Last, but by no means least, when you double click on a Site page to insert new material, one of the icons is UPLOAD. Did I know this? No, I did not. I just worked out how to use some of them and ignored the others. I was a fool. But no longer. Now I know that I do not need to upload every image I want to use to Drive before I can insert it on a Sites page: I can upload direct!

Thursday, 27 May 2021

DFI4 - Manaiakalani - Digital Fluency Intensive Course - Week 4: Dealing With Data

Today's DFI was mostly about data, which I enjoy, so it was a fun day.


Learn

The focus for learning about Manaiakalani kaupapa and pedagogy was on the SHARE aspect of the Learn-Create-Share model.

Sharing is all about being connected. Manaiakalani students shared their work more than usual during the lockdown and their writing improved over the year whereas the writing for the whole of NZ had actually slid downwards during 2020.

It is natural for humans to want to share our creative work with each other and it is only the mode which has changed over time - from cave drawings to Tik Tok...

2005 saw the explosion of social media - Twitter, Bebo, Facebook, Youtube - and each platform had a tagline that was all about SHARING. 


Sharing might be taking your book to the principal to get a sticker, having your work displayed on the classroom wall or blogging or publishing online to connect to an external, authentic audience. In English, we spend a lot of time encouraging students to write for an audience where, in reality, their audience has ultimately been the teacher and our red pen or NCEA grade.

Although Blogger is a traditional platform with a number of limitations, Manaiakalani still prefers it for reasons of safety and the ability to monitor content and comments. 

Sharing a finished piece of work is an important life skill and important emotional learning - we need to make sure our students understand the importance of completing tasks and experience the satisfaction of receiving feedback, praise and affirmation.

Skill Learning: Dealing With Data

Today's skill learning focus was on dealing with data using Google Sheets, Forms and MyMaps. We also looked some more at Hapara Dashboard and Blogger. I have shared some of my learning below.


Create


Google Forms

We created a Google Form to just practice the different skills involved. This was a timely refresher for me as I am about to create a survey for our department teacher inquiry. Here is my practice form:


This is a link to the summary of responses. I think my favourite part was the pie chart about people's favourite animals:


My Maps - Import Data

One big discovery for today was to realise you could import data to a My Maps layer from a spreadsheet, so that was quite exciting. I did that when creating the map below showing where the course participants would like to go on holiday. My Bubble tutor used the same data set but displayed the school that each participant came from. 

I colour-coded the destinations to show:


Places I have been to


Places I have been very close to


Places I really would like to visit


Places I would go to one day if I win Lotto.


Data Case Study - Google Sheets

Our main creative task for the day was to investigate a student's blogging history. I pulled the archive data from this blog by Molly from Hornby High put it into a sheet:


From the data table I created a chart to show the number of blogs per month made by Molly over the period from 2016 - 2021:


I put the months in reverse order as this is how they appeared on the blog. There is probably a clever way to reverse the series but I couldn't figure it out!

When I embedded the sheet and graph they were very small and was quite proud that I managed to edit the HTML code to resize both objects.


Share


Google Forms - Sections & Locked Mode

I have used Forms before but I was glad to be reminded about how to create sections and send people to different parts of a form depending on how they answered a particular question. 

A new thing I learned was that if you are using Forms for a test quiz (e.g. junior spelling) you can set it so the student can't have any other tab open to look up answers. To do this, go to Settings/Quizzes - check 'Make this a quiz' and then 'Turn on locked mode' - magic! I will be sharing this tip with colleagues.


My Maps

The map below is not something I created today but I am sharing it as an example of how you can use My Maps to support teaching in English: I created this for a Y10 novel unit I was teaching on Alan Gratz's Refugee. I made this one as a model for the students, who all created their own maps to show the journeys of the three characters throughout the interlinked storylines. This was a good cross-curricular learning opportunity as students were discovering a lot of political geography as well as learning online mapping skills.


Google Sheets

Some cool little tricks I picked up today for working in Sheets:

Use the Crop Sheet add-on to crop a sheet down to a particular range of cells or just the area containing data - this makes it look a lot tidier when you embed it on a blog or site.

That student list which put all the first and last names in the same column so you can't sort by surname...

You know: the moment when you have imported some data from KAMAR or somewhere and it's all there in Sheets and you are looking at those student names all in the same column and you are thinking a word associated with Toyota...? Well, there is a solution! Highlight the relevant column and click on Data/Split text to columns. It will split it automatically for you but you can also tell it to split at spaces or at a specific character. I wish I had known about this one before!

Another reminder of a long-unused and mostly forgotten skill I once had was how to record a macro and, more importantly, WHY I might want to do so. For example, I do a lot of graphs of our literacy and NCEA English data. I was reminded that I can use Tools/Macros/Record macro to record myself formatting one graph from a set of data and then not have to repeat that set of formatting actions again for every single graph I create, instead just running the macro which I have called 'Format chart' or whatever.

The Autocrat add-on would be handy if you are running a conference or workshops etc. It lets you create registration forms that feed back to the responders with documents, folders and links. It can create forms for you, and also when a workshop gets filled it will block the workshop so no more people can register. Aside from the conference/booking functionality, it also allows you to display data from a sheet in a nice-looking table which you can show on a site or in a Google Doc - giving a more user-friendly look and interface. I am wondering if I could use this to help display tracking information for our literacy target students.